
1. LangGraph의 구성 요소
구성 요소
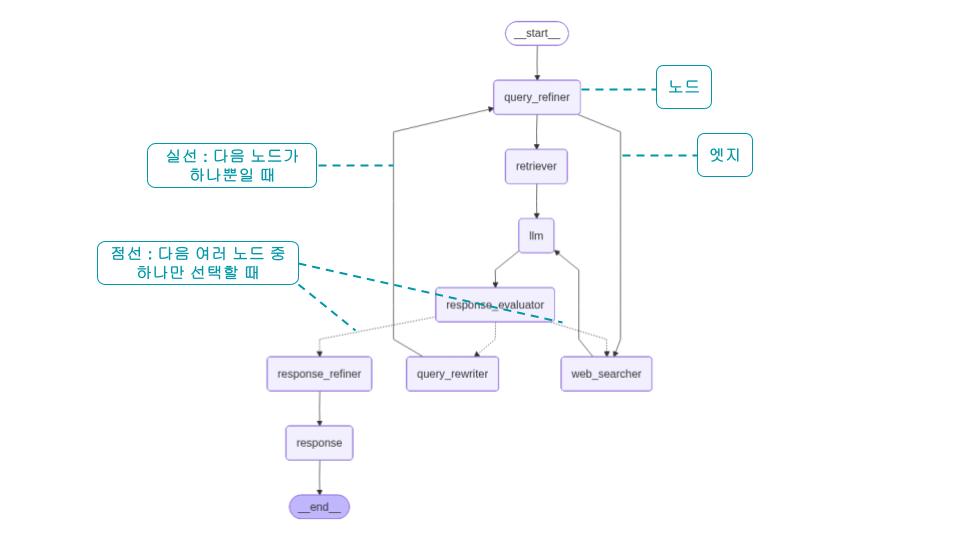
- Node 노드 : 하나의 작업이나 단계.
- Edge 엣지 : 노드간의 연결. 방향성을 가짐
- State 상태 : 노드가 작업한 결과를 기록해 두는 작업 일지
- Graph 그래프 : 노드와 엣지로 이루어진, 흐름을 가진 작업의 그룹
(1) Node 노드
- Node는 실제 작업을 수행하는 Python 함수. 또는 작업자.
- 각 노드들은 독립적이며 서로 어떠한 작업을 어떻게 수행하는지 모른다.
- 따라서 State(상태)라는 것을 주고 받으면서 노드간에 현재 상태 공유한다.
- 하나의 노드는 이전 노드로부터 State를 받아서 작업 처리 후 새로운 State를 반환한다.
1
2
3
4
5
6
7
# 카운터를 1 증가시키는 노드
def add_one(state):
    return {"count": state["count"] + 1}

# 이름을 설정하는 노드
def set_name(state):
    return {"name": "Alice"}
Node의 규칙
1) 항상 state를 첫 번째 매개변수로 받는다.
2) 딕셔너리 형태로 새로운 상태를 반환한다.
3) 반환하지 않은 필드는 상태에서 기존 값을 유지한다.
(2) State 상태
- 현재 상태 및 데이터 저장소
- State는 모든 노드가 공유하는 데이터 저장소로, 랭그래프 APP의 현재 상태를 기록한다.
- 작업의 결과나 현재 상태를 기록하는 “일지”와 같다고 볼 수 있다.
- 각 노드들은 이전 노드로부터 State를 받아, 작업을 처리하고 필요시 State를 업데이트한다.
1
2
3
4
5
6
7
8
9
10
11
# 간단한 State 예제 : 카운트, 이름
class SimpleState(TypedDict):
    count: int
    name: str

# 또는
from pydantic import BaseModel
class SimpleState(BaseModel):
    query: str # 사용자 질의
    documents: list[str] # 검색된 문서
    response: str # LLM 답변
State의 규칙
1) 모든 노드는 State를 보고, 수정할 수 있다.
2) TypedDict 또는 Pydantic의 BaseModel을 사용해 정의하곤 한다.
3) 어떠한 종류의 데이터든 저장할 수 있다.
(3) Edge 엣지
- 노드를 연결하는 화살표
- Edge는 노드들 사이의 연결을 정의한다.
- 즉, 이 작업 다음에 할 작업을 알려주는 역할. 연결자
1
2
3
4
5
6
7
8
9
10
11
12
13
14
15
16
17
18
19
20
21
22
23
24
25
from langgraph.graph import START, END

# 기본적인 엣지 연결
graph.add_edge("노드1", "노드2")  # 노드1 → 노드2

# 시작과 끝 연결 (START, END 상수 사용)
graph.add_edge(START, "첫번째노드")  # 시작 → 첫번째노드
graph.add_edge("마지막노드", END)   # 마지막노드 → 끝

# 병렬 실행 (Parallel)
builder.add_edge("query_refiner", "retriever")
builder.add_edge("query_refiner", "web_searcher")

# 병렬 실행 집결 (Fan-in)
builder.add_edge("retriever", "llm")
builder.add_edge("web_searcher", "llm")

# 분기 처리
builder.add_conditional_edges(
    "response_evaluator",
    lambda x: "web_searcher" if x["response_grade"] == "back to web searcher" else\
              "query_rewriter" if x["response_grade"] == "back to query" else\
              "response_refiner" if x["response_grade"] == "pass" else "",
    {"web_searcher": "web_searcher", "query_rewriter": "query_rewriter", "response_refiner":"response_refiner"}
)
(4) Graph
- Node와 Edge를 모아 하나의 실행 흐름으로 만든 것
- 단순한 그림이 아니라, 실제로 실행 가능한 워크플로우
- “어떤 상태(State)”를 가지고, “어떤 노드(Node)”들을, “어떤 순서와 조건(Edge)”로 실행할지 정의한 전체 설계도이자 실행 단위
- LangGraph에서는 보통 StateGraph를 사용한다.
1
2
3
4
5
6
7
8
9
10
11
12
13
14
15
16
17
18
19
20
21
22
23
24
25
26
27
28
29
30
31
32
33
34
from typing import TypedDict
from langgraph.graph import StateGraph, START, END

# 1) State 정의
class MyState(TypedDict):
    count: int
    name: str

# 2) Node 정의
def add_one(state: MyState):
    return {"count": state["count"] + 1}

def set_name(state: MyState):
    return {"name": "Alice"}

# 3) Graph 생성
builder = StateGraph(MyState)

# 4) Node 등록
builder.add_node("add_one", add_one)
builder.add_node("set_name", set_name)

# 5) Edge 연결
builder.add_edge(START, "add_one")
builder.add_edge("add_one", "set_name")
builder.add_edge("set_name", END)

# 6) 컴파일
graph = builder.compile()

# 7) 실행
result = graph.invoke({"count": 0, "name": ""})
print(result)
# {"count": 1, "name": "Alice"}
StateGraph의 특징
1) “State(상태)”를 중심으로 동작한다.
2) Node와 Edge로 구성된다.
2. 간단한 그래프 만들어보기
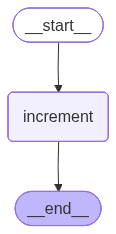
(1) 단일 노드 - 단순 숫자 카운팅 랭그래프
1
2
3
4
5
6
7
8
9
10
11
12
13
14
15
16
17
18
19
20
21
22
23
24
25
from langgraph.graph import StateGraph, START, END
from typing import TypedDict

# (1) State: 카운터를 저장하는 상자
class CounterState(TypedDict):
    count: int

# (2) Node: 카운터를 증가시키는 함수
def increment(state):
    print(f"현재 카운트: {state['count']}")
    new_count = state["count"] + 1
    print(f"새로운 카운트: {new_count}")
    return {"count": new_count}

# (3) Edge: 노드들을 연결하는 그래프
graph = StateGraph(CounterState)
graph.add_node("increment", increment)
graph.add_edge(START, "increment")
graph.add_edge("increment", END)

# 실행해보기
app = graph.compile()
result = app.invoke({"count": 0})
print(f"최종 결과: {result}")
1
2
3
현재 카운트: 0
새로운 카운트: 1
최종 결과: {'count': 1}
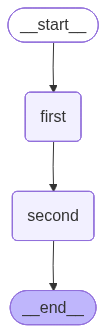
(2) 노드 연결 - 단순 숫자 카운팅 랭그래프
1
2
3
4
5
6
7
8
9
10
11
12
13
14
15
16
17
18
19
20
21
22
23
24
# 첫 번째 증가 함수
def first_increment(state):
    print("첫 번째 증가")
    return {"count": state["count"] + 1}

# 두 번째 증가 함수
def second_increment(state):
    print("두 번째 증가")
    return {"count": state["count"] + 10}

# 그래프 구성
graph = StateGraph(CounterState)
graph.add_node("first", first_increment)
graph.add_node("second", second_increment)

# 연결: START → first → second → END
graph.add_edge(START, "first")
graph.add_edge("first", "second")
graph.add_edge("second", END)

# 실행
app = graph.compile()
result = app.invoke({"count": 0})
print(f"최종 결과: {result}")
1
2
3
첫 번째 증가
두 번째 증가
최종 결과: {'count': 11}
3. 랭그래프 아키텍처
- Google의 Pregel 시스템의 메시지 전달(Message Passing) 아키텍처에서 영감을 받음
- Pregel에서 각 정점(vertex)은 현재 단계에서 자신의 계산을 수행한다.
- 정점들은 서로 독립적인 형태로, 상대 정점이 어떤 작업을 하는지 모른다.
- 정점 간 데이터 공유가 필요할 때에는 한 정점이 상대 정점에게 메시지를 보낸다.
- LangGraph는 이와 비슷하게(하지만 다름) State(상태)라는 것을 노드 간 공유하면서, 상태 중심의 인터페이스를 가지며 동작한다.
Reference
Do it! LLM을 활용한 AI 에이전트 개발 입문 (이성용 저)
https://wikidocs.net/261579
https://www.youtube.com/watch?v=W_uwR_yx4-c
Comments