데이터베이스와 컬렉션

컬렉션

컬렉션이란

  • 벡터 데이터와 관련된 메타데이터를 저장·검색·인덱싱 하는 기본 단위
  • SQL에서 테이블에 해당함.
  • 고정 개수의 열과 유동 개수 행이 있는 2차원 테이블 구조.
  • 각 행은 “엔티티” 라고 하며, SQL 의 레코드와 유사함.

[https://milvus.io/docs/v2.5.x/assets/collection-explained.png](https://milvus.io/docs/v2.5.x/assets/collection-explained.png)

컬렉션의 구성 항목

컬렉션의 구성 항목 설명
Schema - 컬렉션의 전체 데이터 구조.
- 어떤 필드(벡터, 속성)가 있는지
- 각 필드의 타입과 역할이 무엇인지 지정.
Fields - 컬렉션 안에 정의된 각 개별 필드들.
- RDB 의 컬럼과 같은 역할.
- 예: 벡터 필드, 정수/문자열 필드, 메타데이터 필드 등.
Entity - 컬렉션 안에 저장되는 개별 데이터 단위.
- RDB 에서의 레코드 (한 행)와 유사
- 하나의 벡터 + 그에 연결된 속성 값들의 묶음.
Primary key - 각 엔티티(Entity)를 고유하게 식별하는 필드.
- 주로 string 또는 int64 타입 사용.
AutoId - Primary key를 자동으로 생성할지 여부를 결정.
- True로 하면 Milvus가 내부적으로 ID를 자동 생성.
Index - 검색 성능을 높이기 위해 필드에 생성하는 데이터 구조.
- 애플리케이션에서 조회하는 모든 필드에 인덱스 생성을 권장.
- 그 중 Vector Field 에 대해서는 필수적으로 인덱스 생성.
Load - 컬렉션 데이터를 디스크에서 메모리로 로딩하는 작업
- 이를 통해 검색 가능 상태로 만든다.
Release - 메모리에서 컬렉션 데이터를 내려서 리소스를 회수하는 작업.
Search - 벡터 유사도 검색 작업.
- 주어진 쿼리 벡터와 가장 가까운 벡터들을 찾아 반환.
Query - 조건 기반 속성(예: 필터링)으로 데이터를 조회하는 작업.
- 벡터 유사도 검색과는 별개로 작동하거나 함께 사용 가능.
Partition - 컬렉션 내부에서 데이터를 논리적으로 분할하여 관리하는 단위.
- 해당 컬렉션에 있는 엔티티들의 하위 집합을 포함한다.
- 특정 파티션에서만 검색하도록 할 수 있으며,
- 이 때 메모리에 올릴 데이터가 줄어드므로 성능 최적화에 유리.
Shard - 물리적으로 데이터를 분산 저장하기 위한 단위.
- 샤드를 통해 데이터와 요청을 여러 노드에 분산 처리.
Alias - 컬렉션에 별칭을 붙이는 기능
- 컬렉션의 이름 변경, 버전 관리에 따른 컬렉션 조회 실패를 방지
Function - Milvus에서 제공하는 주요 기능들을 통칭.
- 예: Insert, Delete, Search, Query, Index build, Load, Release 등.
Consistency Level - 다중 노드 환경에서 데이터 일관성의 수준
- Strong, Session, Bounded, Eventually 등의 레벨이 있음.

데이터베이스

  • 데이터를 구성하고 관리하기 위한 논리적인 최상위 단위
  • SQL 의 "데이터베이스" 에 해당 함.
  • 데이터베이스는 0 개 이상, 65,535개 이하의 컬랙션을 가질 수 있음.
  • 여러 데이터베이스를 생성할 수 있고, 이를 서로 다른 애플리케이션 또는 테넌트에 대한 데이터를 논리적으로 분리해 저장할 수 있음.

데이터베이스

데이터베이스 만들기

  • MilvusClient 클래스 인스턴스를 만들어 연결 객체를 만들고
  • create_database 메서드를 사용해 데이터베이스를 만들 수 있다.
1
2
3
4
5
6
7
8
9
10
11
12
13
14
15
16
17
18
19
20
21
import pymilvus

milvus_host = 'milvus 실행중인 서버 IP'
milvus_port = '19530'
database_name = 'my_database_1'
milvus_username = 'root'    # milvus 기본 계정
milvus_password = 'Milvus'  # milvus 기본 비밀번호

# 데이터베이스 만들기
from pymilvus import MilvusClient

# milvus client 인스턴스 생성
client = MilvusClient(
    uri=f"http://{milvus_host}:{milvus_port}",
    token=f"{milvus_username}:{milvus_password}"
)

# database 생성
client.create_database(
    db_name="my_database_1"
)
  • 데이터베이스를 만들면서 속성 설정도 가능
1
2
3
4
5
6
client.create_database(
    db_name="my_database_2",
    properties={
        "database.replica.number": 3
    }
)
  • Milvus WebUI 에서 아래와 같이 조회된다.

데이터베이스의 속성값

  • 아래와 같은 속성들이 있음.
속성 이름 유형 속성 설명
database.replica.number 정수 지정된 데이터베이스의 복제본 수입니다.
database.resource_groups 문자열 지정된 데이터베이스와 연결된 리소스 그룹의 이름을 쉼표로 구분한 목록입니다.
database.diskQuota.mb 정수 지정한 데이터베이스의 디스크 공간 최대 크기(MB)입니다.
database.max.collections 정수 지정한 데이터베이스에 허용되는 최대 컬렉션 수입니다.
database.force.deny.writing 부울 지정한 데이터베이스에서 쓰기 작업을 거부하도록 강제할지 여부입니다.
database.force.deny.reading boolean 지정한 데이터베이스에서 읽기 작업을 거부하도록 할지 여부입니다.

데이터베이스 조회하기

데이터베이스 목록 조회

  • list_databases() : 데이터베이스 리스트 조회.
1
2
3
4
5
# List all existing databases
client.list_databases()

# Output
# ['default', 'my_database_1', 'my_database_2']

데이터베이스 정보(메타데이터) 조회

  • describe_database(db_name) : 지정 데이터베이스의 정보 조회.
1
2
3
4
5
6
7
# Check database details
client.describe_database(
    db_name="default"
)

# Output
# {"name": "default"}

데이터베이스 속성 변경 및 삭제

  • alter_database_properties 메서드를 이용해 속성 변경이 가능
1
2
3
4
5
6
client.alter_database_properties(
    db_name: "my_database_1",
    properties: {
        "database.max.collections": 10
    }
)
  • drop_database_properties 메서드를 이용해 속성 삭제 가능
1
2
3
4
5
6
client.drop_database_properties(
    db_name: "my_database_1",
    property_keys: [
        "database.max.collections"
    ]
)

사용하는 데이터베이스 전환

  • use_database 메서드를 이용해 데이터베이스 전환 가능
1
2
3
client.use_database(
    db_name="my_database_2"
)

데이터베이스 삭제

  • drop_database 메서드를 이용해 데이터베이스 삭제 가능
1
2
3
client.drop_database(
    db_name="my_database_2"
)

컬렉션

컬렉션 만들기

스키마 만들기

  • client.create_schema : 스키마 생성. 이 때 auto_iddynamic_field 옵션을 설정한다.
  • schema.add_field : 스키마에 필드 추가. 필드 이름과 속성을 설정한다.
1
2
3
4
5
6
7
8
9
10
11
12
13
14
15
16
17
18
19
20
21
22
23
24
25
26
# 스키마 생성
from pymilvus import MilvusClient, DataType
import dotenv

milvus_host = os.getenv('MILVUS_HOST')
milvus_port = os.getenv('MILVUS_PORT')
database_name = 'my_database_1'
milvus_username = 'root'    # milvus 기본 계정
milvus_password = 'Milvus'  # milvus 기본 비밀번호

# milvus client 인스턴스 생성
client = MilvusClient(
    uri=f"http://{milvus_host}:{milvus_port}",
    token=f"{milvus_username}:{milvus_password}"
)

# Create schema
schema = MilvusClient.create_schema(
    auto_id=False,
    enable_dynamic_field=True,
)

# Add fields to schema
schema.add_field(field_name="my_id", datatype=DataType.INT64, is_primary=True)
schema.add_field(field_name="my_vector", datatype=DataType.FLOAT_VECTOR, dim=5)
schema.add_field(field_name="my_varchar", datatype=DataType.VARCHAR, max_length=512)
  • 스키마 확인해보기
1
2
3
4
5
6
7
8
9
10
11
12
13
14
15
16
17
18
19
print(schema.to_dict())

# Output
{'auto_id': False,
 'description': '',
 'fields': [{'name': 'my_id',
   'description': '',
   'type': <DataType.INT64: 5>,
   'is_primary': True,
   'auto_id': False},
  {'name': 'my_vector',
   'description': '',
   'type': <DataType.FLOAT_VECTOR: 101>,
   'params': {'dim': 5}},
  {'name': 'my_varchar',
   'description': '',
   'type': <DataType.VARCHAR: 21>,
   'params': {'max_length': 512}}],
 'enable_dynamic_field': True}

인덱스 만들기

  • add_index : 필드에 대한 인덱스를 추가할 수 있다.
1
2
3
4
5
6
7
8
9
10
11
12
13
14
# Prepare index parameters
index_params = client.prepare_index_params()

# Add indexes
index_params.add_index(
    field_name="my_id",
    index_type="AUTOINDEX"
)

index_params.add_index(
    field_name="my_vector", 
    index_type="AUTOINDEX",
    metric_type="COSINE"
)
  • 인덱스 설정 확인해보기
1
2
3
4
5
6
7
8
9
10
11
12
13
14
15
16
print(index_params)

# Output
[
	{
		'field_name': 'my_id',
		'index_type': 'AUTOINDEX',
		'index_name': ''
	},
	{
		'field_name': 'my_vector',
		'index_type': 'AUTOINDEX',
		'index_name': '',
		'metric_type': 'COSINE'
	}
]

컬렉션 만들기

  • client.create_collection 메서드로 컬렉션 생성
1
2
3
4
5
6
7
8
9
10
# Create a collection with the index loaded simultaneously
client.create_collection(
    collection_name="customized_setup_1",
    schema=schema,
    index_params=index_params
)

res = client.get_load_state(
    collection_name="customized_setup_1"
)
  • response 를 출력해보면 아래와 같음.
1
2
3
4
print(res)

# Output
{'state': <LoadState: Loaded>}
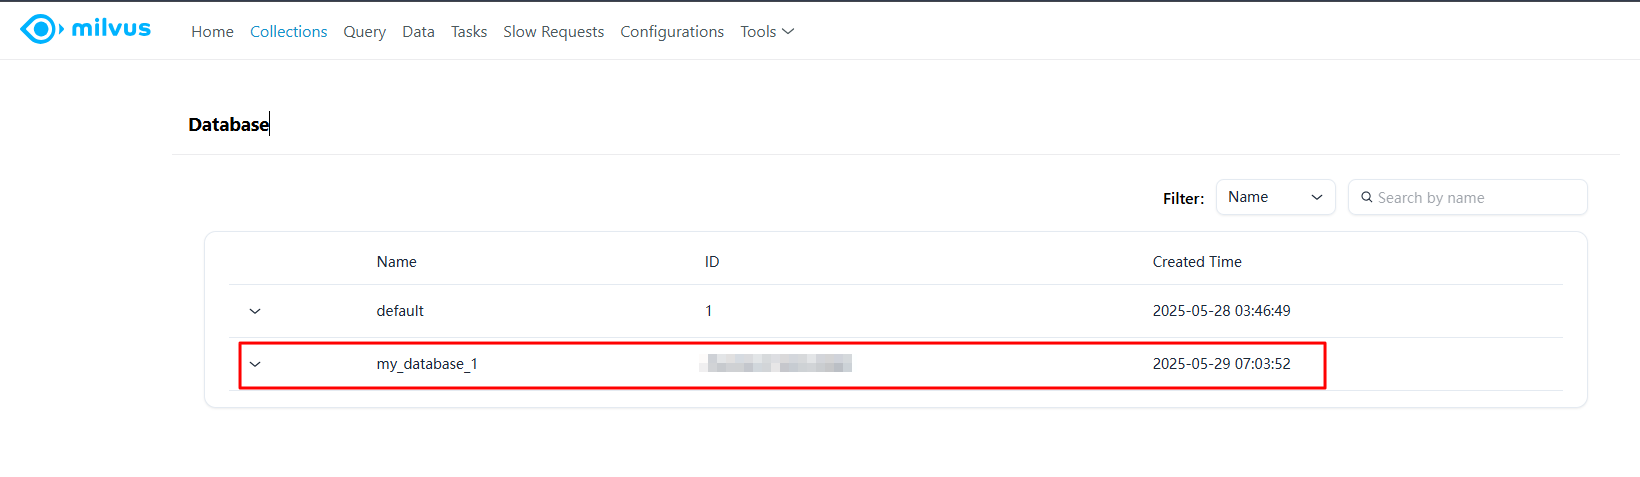
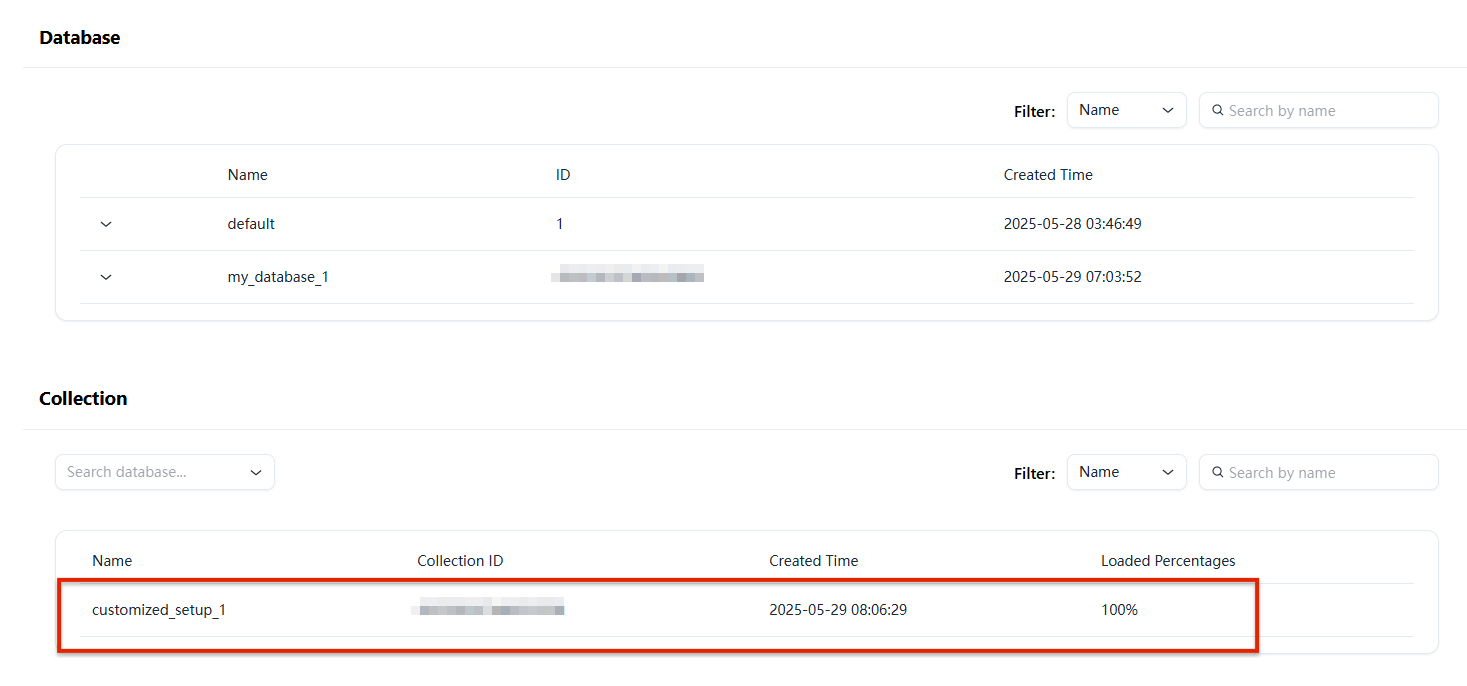
  • Milvus WebUI 에서 확인해보면


컬렉션 전환

  • 다른 컬렉션으로 전환할 때에는 get_load_state 메서드를 사용
1
2
3
4
5
6
7
8
9
10
11
12
13
14
15
16
17
# 3.6. Create a collection and index it separately
client.create_collection(
    collection_name="customized_setup_2",
    schema=schema,
)

res = client.get_load_state(
    collection_name="customized_setup_2"
)

print(res)

# Output
#
# {
#     "state": "<LoadState: NotLoad>"
# }

컬렉션 속성 설정

샤드 번호 설정

  • 컬렉션을 만들 때 분산 처리를 위한 샤드 설정을 할 수 있음.
  • 샤드는 해당 컬렉션에 인입되는 데이터를 얼마나 분산해서 저장할지에 대한 설정임.
  • 복제(replica) 와는 다른 개념임.

▶ 샤드를 늘리는 기준
아래는 일반적으로 권장되는 (공식DOC) 샤드 증설 기준이다.
(1) 예상 처리량이 500MB/s 증가하거나
(2) 삽입할 데이터의 양이 100GB 증가할 때마다

1
2
3
4
5
6
# With shard number
client.create_collection(
    collection_name="customized_setup_3",
    schema=schema,
    num_shards=1
)

mmap 활성화

  • mmap : 컬렉션을 로드하는 방식 중 하나. 메모리 매핑 방식.
컬렉션 로드 방식 설명
cache 모드 - 데이터를 메모리에 복사해서 올림
- 속도 빠름, 메모리 많이 필요
mmap 모드 - 디스크 파일을 OS의 메모리 매핑 기능으로 연결
- 실제로 접근할 때만 메모리에 읽어옴
- 메모리 절약
- I/O 속도는 장비와 OS에 의존
  • 이를 컬렉션에 적용할 때에는 enable_mmap 속성을 True 로 설정하면 됨.
1
2
3
4
5
6
# With mmap
client.create_collection(
    collection_name="customized_setup_4",
    schema=schema,
    enable_mmap=False
)

컬렉션 TTL(Time-To-Live) 설정

  • TTL : Time-To-Live. 데이터의 수명을 설정하는 옵션.
  • collection.ttl.seconds 속성값을 지정함으로써 설정할 수 있음.
  • 속성값 단위는 초(sec)
1
2
3
4
5
6
7
8
# With TTL
client.create_collection(
    collection_name="customized_setup_5",
    schema=schema,
    properties={
        "collection.ttl.seconds": 86400
    }
)

일관성 수준 설정

  • 컬렉션 검색 및 쿼리에 대한 일관성 수준 설정
  • 일관성이란, 데이터의 읽기에 대한 최신성을 뜻함
  • 데이터 삽입과 삭제 등의 작업이 모든 노드에서 동시에 100% 동기화가 안될 수도 있음.
  • 따라서, 검색과 쿼리시에 최신 데이터까지 포함해서 볼지, 약간 늦더라도 성능을 우선할지 등을 설정하는 게 일관성 수준 설정임.
일관성 수준 설명
Strong 강한 일관성. 최신 데이터까지 반드시 반영. 성능 비용이 높음.
Session 현재 세션 내에서는 강한 일관성, 다른 세션과는 Eventually 수준.
Bounded 삽입 후 지정된 시간(Ts)까지 동기화된 데이터만 보장.
Eventually 최종 일관성. 최신 데이터는 보장하지 않지만 성능은 매우 빠름.
  • 실시간 검색 서비스에서는 Strong이 필요할 수 있지만,
  • 대규모 배치 검색이나 추천 시스템에서는 Eventually로 성능을 높이곤 함.
1
2
3
4
5
6
# With consistency level
client.create_collection(
    collection_name="customized_setup_6",
    schema=schema,
    consistency_level="Bounded",
)

컬렉션 조회

컬렉션 목록 조회

  • client.list_collections() 메서드로 컬렉션 목록을 조회할 수 있음.
1
2
3
4
5
6
7
8
9
10
11
12
13
14
15
16
17
18
19
# 컬렉션 목록 조회
from pymilvus import MilvusClient, DataType
import dotenv

milvus_host = os.getenv('MILVUS_HOST')
milvus_port = os.getenv('MILVUS_PORT')
database_name = 'my_database_1'
milvus_username = 'root'    # milvus 기본 계정
milvus_password = 'Milvus'  # milvus 기본 비밀번호

# milvus client 인스턴스 생성
client = MilvusClient(
    uri=f"http://{milvus_host}:{milvus_port}",
    token=f"{milvus_username}:{milvus_password}"
)

res = client.list_collections()

print(res)
1
2
# Output
['customized_setup_1']

컬렉션 정보 조회

  • client.describe_collection() 메서드로 컬렉션의 정보(메타데이터) 를 조회할 수 있음.
1
2
3
4
5
6
# 컬렉션 정보(메타데이터) 조회
res = client.describe_collection(
    collection_name="customized_setup_1"
)

print(res)
1
2
3
4
5
6
7
8
9
10
11
12
13
14
15
16
17
18
# Output
{'collection_name': 'customized_setup_1',
 'auto_id': False,
 'num_shards': 1,
 'description': '',
 'fields': [{'field_id': 100,
   'name': 'my_id',
   ...
   'params': {'max_length': 512}}],
 'functions': [],
 'aliases': [],
 'collection_id': 458358507460659768,
 'consistency_level': 2,
 'properties': {},
 'num_partitions': 1,
 'enable_dynamic_field': True,
 'created_timestamp': 458360354153693188,
 'update_timestamp': 458360354153693188}

컬렉션 로드와 릴리즈

컬렉션 로드

  • 메모리에 컬렉션의 데이터를 올리는 작업
  • 이를 통해 검색 및 쿼리에 신속하게 응답할 수 있음.
  • client.load_collection() : 컬렉션 로드
1
2
3
4
5
6
7
8
9
10
11
12
13
14
15
16
17
18
19
20
from pymilvus import MilvusClient, DataType
import dotenv

milvus_host = os.getenv('MILVUS_HOST')
milvus_port = os.getenv('MILVUS_PORT')
database_name = 'my_database_1'
milvus_username = 'root'    # milvus 기본 계정
milvus_password = 'Milvus'  # milvus 기본 비밀번호

# Load the collection
client.load_collection(
    collection_name="customized_setup_1"
)

# Check Load State
res = client.get_load_state(
    collection_name="customized_setup_1"
)

print(res)
1
2
# Output
{'state': <LoadState: Loaded>}

특징 필드 로드

  • 특정 필드만 로드할 수 있음
  • 이에 따라 메모리 사용량을 줄이고 검색 성능 개선 가능.
  • load_collectionload_fields 속성값을 통해 지정 가능.
1
2
3
4
5
6
7
8
9
10
11
client.load_collection(
    collection_name="customized_setup_1",
    load_fields=["my_id", "my_vector"], # Load only the specified fields
    skip_load_dynamic_field=True # Skip loading the dynamic field
)

res = client.get_load_state(
    collection_name="customized_setup_1"
)

print(res)
  • 만약 필드 로드 에러가 난다면, 해당 컬렉션을 release한 뒤, 다시 load 해보길 권장함.

컬렉션 릴리즈

  • 컬렉션을 사용하지 않을 때에는 릴리즈를 통해 메모리에서 내려 성능 효율화
  • client.release_collection() 메서드를 통해 릴리즈 가능
1
2
3
4
5
6
7
8
9
10
11
# 컬렉션 릴리즈  

client.release_collection(
    collection_name="customized_setup_1"
)

res = client.get_load_state(
    collection_name="customized_setup_1"
)

print(res)
1
2
# Output
{'state': <LoadState: NotLoad>}

마치며

  • 여기까지 Milvus 의 핵심 구조인 데이터베이스와 컬렉션에 대해 알아봤음.
  • TTL, Partition, alias, drop collection 등 심화 기능은 추후에 다루도록 함.

Reference

https://milvus.io/docs/ko/manage-collections.md
https://milvus.io/docs/ko/manage_databases.md
https://milvus.io/docs/ko/create-collection.md
https://milvus.io/docs/ko/view-collections.md
https://milvus.io/docs/ko/load-and-release.md

Comments