
실습 환경 설명
OS : Rocky 9.3
Gitlab 설치하기
Docker 를 이용한 설치
- Docker 및 Docker Compose 가 설치되어 있어야 합니다.
- 본 실습에서는 Gitlab-CE 17.10.0 을 이용합니다.
- 공식 매뉴얼 : Gitlab 공식 - Docker를 이용한 Gitlab 설치
- 도커 이미지 : gitlab/gitlab-ce:17.10.0-ce.0
(0) 설치 요구사양
| 항목 | 요구사양 | 사용량 |
|---|---|---|
| CPU | 8 vCPU | 초당 20개 요청 or 1,000명 사용자 |
| Memory | 16GB | 상동 |
| Storage | 2GB | 패키지만. Gitlab 저장소 공간은 별도 |
(1) 아래와 같이 Docker Compose yml 파일을 작성합니다.
1
2
3
4
5
6
7
8
9
10
11
12
13
14
15
16
17
18
19
20
21
22
23
24
25
26
services:
  gitlab:
    image: gitlab/gitlab-ce:17.10.0-ce.0
    container_name: gitlab
    restart: always
    environment:
      GITLAB_OMNIBUS_CONFIG: |    # gitlab의 설정값 (gitlab.rb 설정파일의 내용에 해당)
        external_url 'http://지역네트워크내IP:8081'       # gitlab URL
        nginx['listen_port'] = 80           # 컨테이너 안쪽 nginx가 listen 할 포트
        nginx['listen_https'] = false       # https 사용 여부
        nginx['listen_address'] = '0.0.0.0'
        nginx['enable'] = true
        gitlab_rails['gitlab_shell_ssh_port'] = 2424 # SSH 접속시 사용할 포트
        gitlab_rails['gitlab_port'] = 8081  # gitlab 포트 (외부)
        gitlab_rails['allow_local_requests_from_web_hooks_and_services'] = true # 동일 로컬 네트워크대의 웹훅이나 서비스를 바라볼 수 있도록 허용
      GITLAB_ROOT_EMAIL: ${GITLAB_ROOT_EMAIL}        # 관리자 계정
      GITLAB_ROOT_PASSWORD: ${GITLAB_ROOT_PASSWORD}  # 관리자 초기 비밀번호
    ports:
      - '8081:80'
      - '8444:443'
      - '2424:22'    # gitlab_rails와 동일하게 설정
    volumes: # 볼륨마운트 : 호스트 폴더($GITLAB_HOME)는 상황에 맞춰 설정
      - '/data/gitlab/config:/etc/gitlab'
      - '/data/gitlab/logs:/var/log/gitlab'
      - '/data/gitlab/data:/var/opt/gitlab'
    shm_size: '256m'
(2) docker-compose.yml 파일이 위치한 디렉터리에 .env 파일을 만들고, 루트 계정을 넣어줍니다.
1
2
3
4
5
6
7
touch ./.env
cat >> ./.env

GITLAB_ROOT_EMAIL=이메일@도메인
GITLAB_ROOT_PASSWORD=비밀번호

CTRL+D
(3) docker compose 를 up 합니다.
- 실행 전 체크 : 현재 유저가 sudo 권한을 가지고 있어야(sudoer에 등록 되어 있어야) 합니다.
1
sudo docker compose up -d
1
2
3
4
5
6
7
8
9
10
11
12
13
14
15
16
17
18
19
# 잘 실행이 됐다면
[gitlab@localhost ~]$ sudo docker compose up -d
WARN[0000] The "GITLAB_HOME" variable is not set. Defaulting to a blank string.
WARN[0000] The "GITLAB_HOME" variable is not set. Defaulting to a blank string.
WARN[0000] The "GITLAB_HOME" variable is not set. Defaulting to a blank string.
[+] Running 10/10
 ✔ gitlab 9 layers [⣿⣿⣿⣿⣿⣿⣿⣿⣿]      0B/0B      Pulled    198.9s
   ✔ 9cb31e2e37ea Pull complete                          3.1s
   ✔ 5f065cc6e307 Pull complete                          1.4s
   ✔ 7246adc1670e Pull complete                          3.7s
   ✔ 4344201f1b49 Pull complete                          2.2s
   ✔ db6a9e33d1eb Pull complete                          3.0s
   ✔ 895b7eaad0c0 Pull complete                          3.9s
   ✔ d3b2cfb6c5ac Pull complete                          4.0s
   ✔ 1338108f1f23 Pull complete                          4.5s
   ✔ e4ab593f4440 Pull complete                          150.8s
[+] Running 2/2
 ✔ Network gitlab_default  Created                       0.2s
 ✔ Container gitlab        Started                       0.7s
(4) 웹 브라우저를 통해 접근해줍니다.
- SSL 설정등을 하지 않았으므로, 우선 HTTP 포트 (8081) 로 접근합니다.
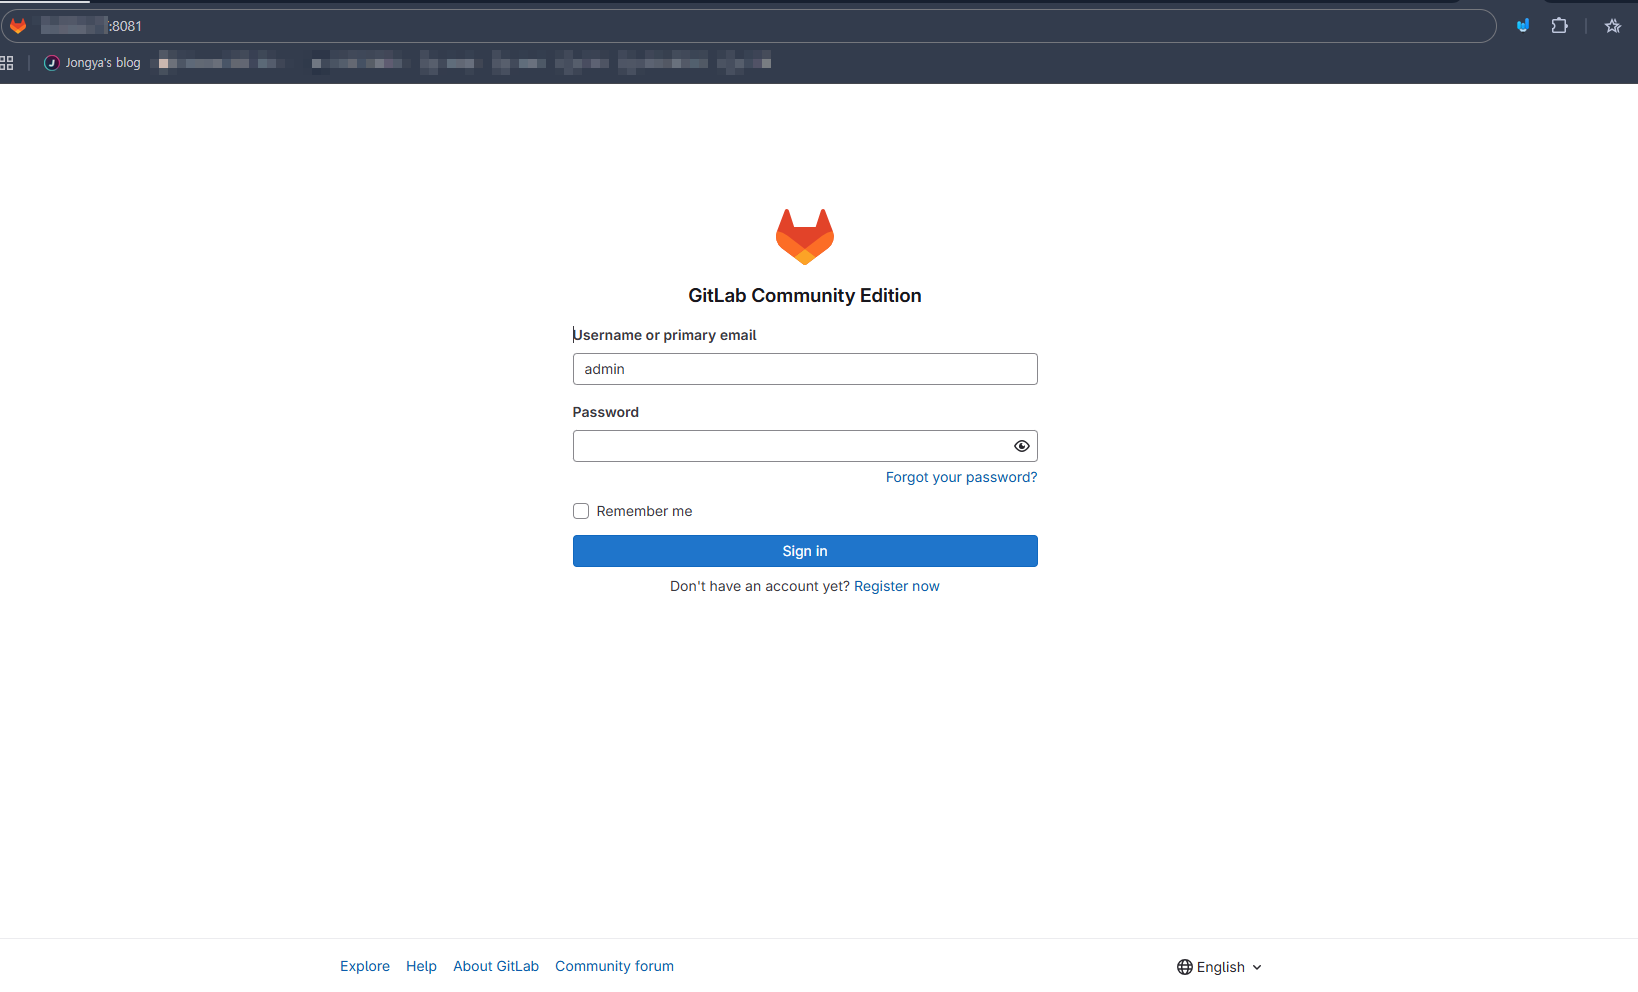
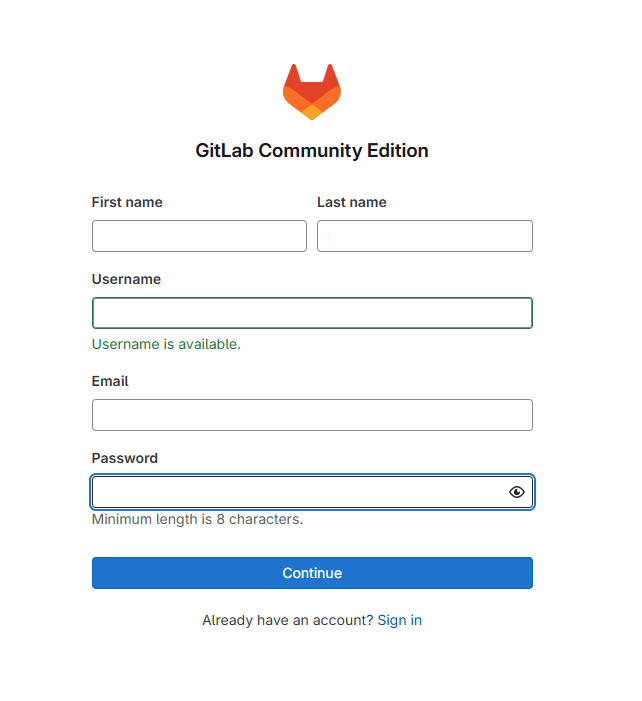
(5) 사용자 가입
도메인과 SSL 인증
gitlab 을 사용할 때 도메인을 입히면 외부에서도 접속이 가능하고, 여러모로 편리한 점이 많습니다. 따라서 이번에는 깃랩 서비스에 도메인을 입혀 사용해보도록 하겠습니다.
먼저, 무료 도메인을 얻기 위해 duckdns 를 사용해보겠습니다. duckdns 홈페이지에 사용법이 잘 설명되어 있으므로, 별도의 사용법을 기재하지는 않겠습니다.
다음은 SSL 인증을 받는 단계입니다. 도메인을 기반으로 쉽게 SSL 인증서를 받을 수 있는 letsencrypt 를 사용할 건데요, 그러기 위해서는 외부의 letsencrypt 서비스에서 서버의 80, 443 포트로 접근할 수 있어야 합니다. 따라서 서버 방화벽이나 통신사 공유기 등의 설정을 체크하기 바랍니다.
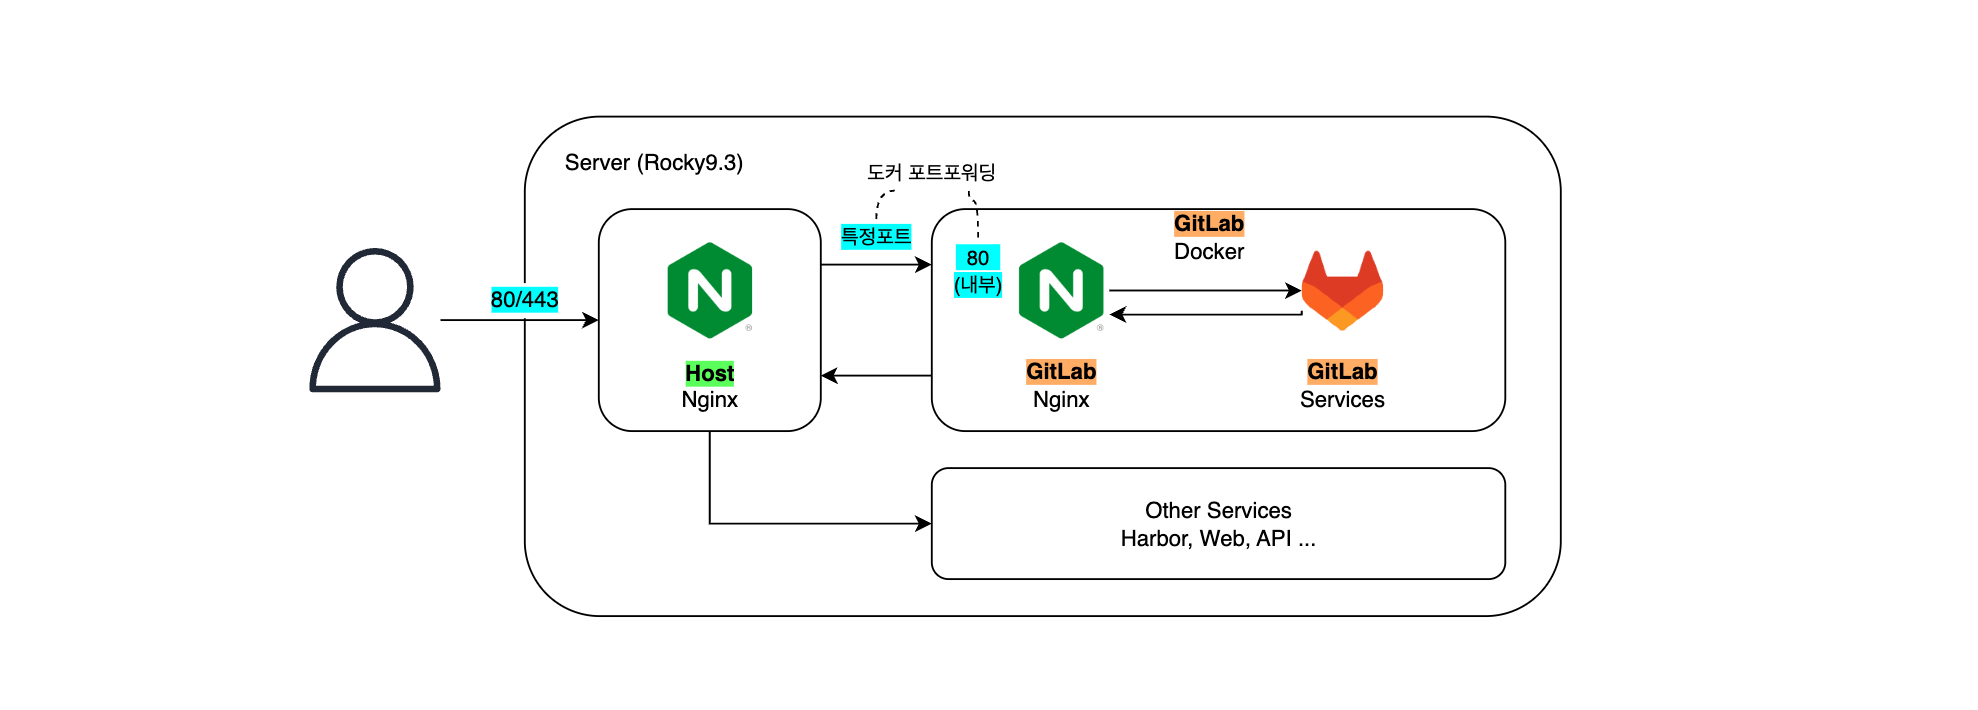
제 경우엔 깃랩 말고도 작동중인 다른 서비스들이 있어서, 아래와 같이 리버스 프록시 Nginx 를 두고, 프록시를 이용해서 서비스에 접근할 수 있도록 구성하였습니다.
우선, 호스트의 nginx 를 잠시 멈추고, lets encrypt 를 통해 ssl 인증을 받습니다.
1
2
sudo systemctl stop nginx
sudo certbot certonly --standalone -d mygitlab.duckdns.org
정상적으로 완료가 되면 nginx 설정파일에 ssl 내용을 추가해줍니다.
1
sudo nano /etc/nginx/nginx.conf
1
2
3
4
5
6
7
8
9
10
11
12
13
14
15
16
17
18
19
20
21
22
23
24
25
26
27
28
29
...
http{
	server{
		server_name mygitlab.duckdns.org;

        location / {
        proxy_pass http://127.0.0.1:8081;
        proxy_set_header Host $host;
        proxy_set_header X-Real-IP $remote_addr;
        proxy_set_header X-Forwarded-For $proxy_add_x_forwarded_for;
        proxy_set_header X-Forwarded-Proto http;
        }

		error_page 404 /404.html;
        location = /404.html {
        }

        error_page 500 502 503 504 /50x.html;
        location = /50x.html {
        }

		listen 443 ssl; # managed by Certbot
		listen 80 ssl;
		ssl_certificate /etc/letsencrypt/live/mygitlab.duckdns.org/fullchain.pem;
		ssl_certificate_key /etc/letsencrypt/live/mygitlab.duckdns.org/privkey.pem;
		include /etc/letsencrypt/options-ssl-nginx.conf;
		ssl_dhparam /etc/letsencrypt/ssl-dhparams.pem; # managed by Certbot
	}
}
1
sudo systemctl restart nginx
자동 갱신을 위해 crontab 설정을 해줍니다.
1
sudo crontab -e
1
2
3
4
1 0 * * * sudo certbot renew --cert-name mygitlab.duckdns.org --pre-hook "systemctl stop nginx" --post-hook "systemctl start nginx"

# 매일 1시 0분에 certbot renew 실행
# certbot renew 전에 nginx 를 중지하고, certbot renew 후에 nginx 를 재기동함
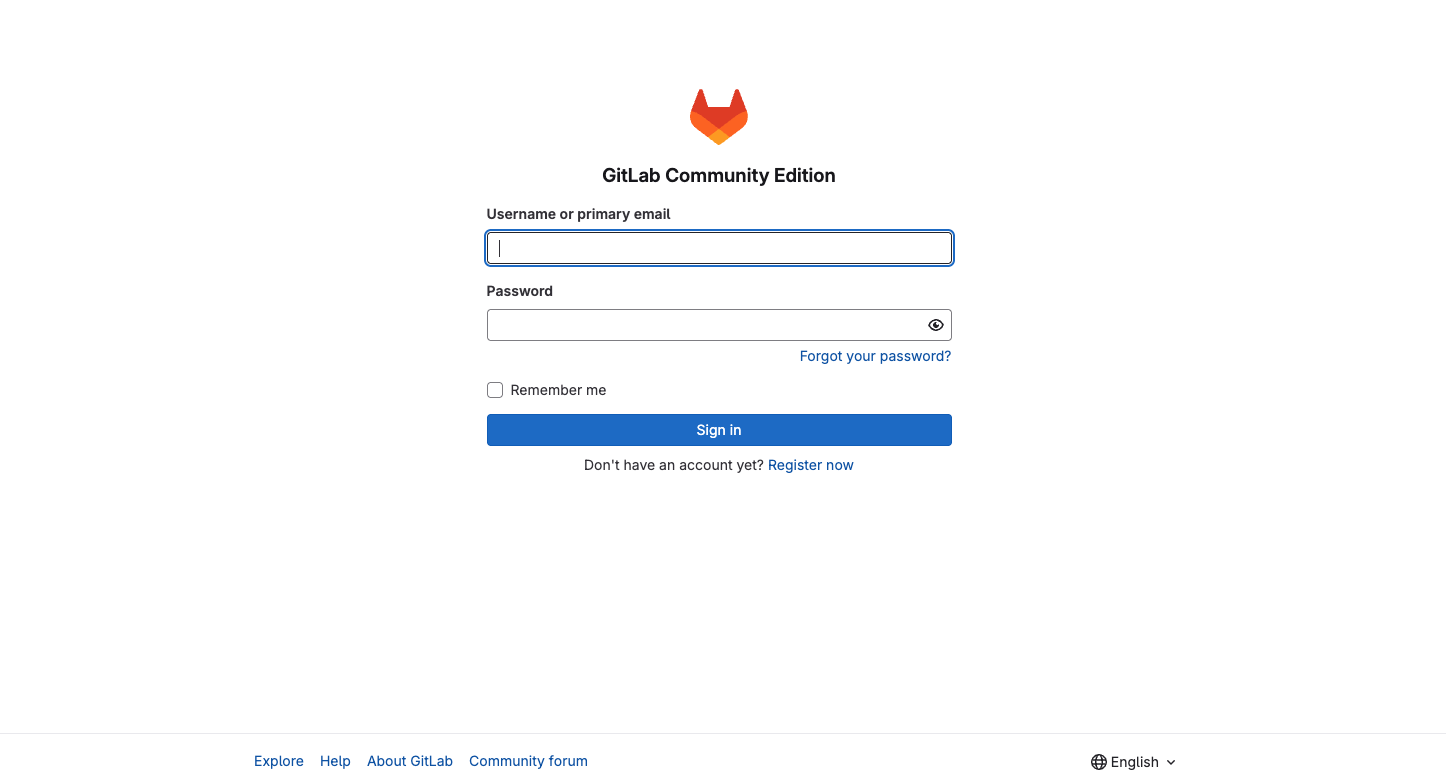
접속했을 때 아래와 같이 깃랩 화면이 보인다면 성공입니다.
도메인 적용 마무리하기
이제 도메인을 통한 깃랩 접속까지 가능합니다. 마지막으로 할 작업은 “깃랩이 자신의 도메인을 알도록” 해주는 것입니다.
이를 위해 도커 컴포즈의 external_url 부분을 수정해줍니다.
1
2
3
4
5
6
7
8
9
services:
  gitlab:
    ...
    environment:
      GITLAB_OMNIBUS_CONFIG: |    # gitlab의 설정값 (gitlab.rb 설정파일의 내용에 해당)
        external_url 'https://mygitlab.duckdns.org'       # 여기 수정
    ...
    extra_hosts:
      - "myharbor.duckdns.org:172.17.0.1" # 동일서버 dns 꼬임 방지 (harbor)
완료가 되었다면, 해당 도커를 재실행해 줍니다.
1
sudo docker restart gitlab
Trouble Shooting
gitlab 과 harbor 가 같은 서버일 떄 프록시 설정이 굉장히 복잡함
gitlab 과 docker registry 가 동일 서버상에 있을 때에는 아래 두 가지를 필수적으로 수행해야 원활한 작동이 가능합니다.
(1) gitlab 도커에서 harbor 의 도메인을 바라볼 때, 동일 도커 네트워크를 먼저 바라보도록 hosts 설정
(2) gitlab 설정 중 Allow requests to the local network from web hooks and services 를 통해 동일 로컬에 존재하는 서비스와도 연결할 수 있도록 함
따라서 docker-compose.yml 파일에 아래와 같이 구성합니다.
1
2
3
4
5
6
7
	environment:
      GITLAB_OMNIBUS_CONFIG: |    # gitlab의 설정값 (gitlab.rb 설정파일의 내용에 해당)
        ...
        gitlab_rails['allow_local_requests_from_web_hooks_and_services'] = true # 동일 로컬 네트워크대의 웹훅이나 서비스를 바라볼 수 있도록 허용
    ...
    extra_hosts:
      - "myharbor.duckdns.org:172.17.0.1" # 동일서버 dns 꼬임 방지 (harbor)
gitlab 은 동일 서버에서 서빙되는 서비스에 연결하지 못하는 게 기본 설정임
에러 메시지
1
Validations failed. Url is blocked: Requests to the local network are not allowed
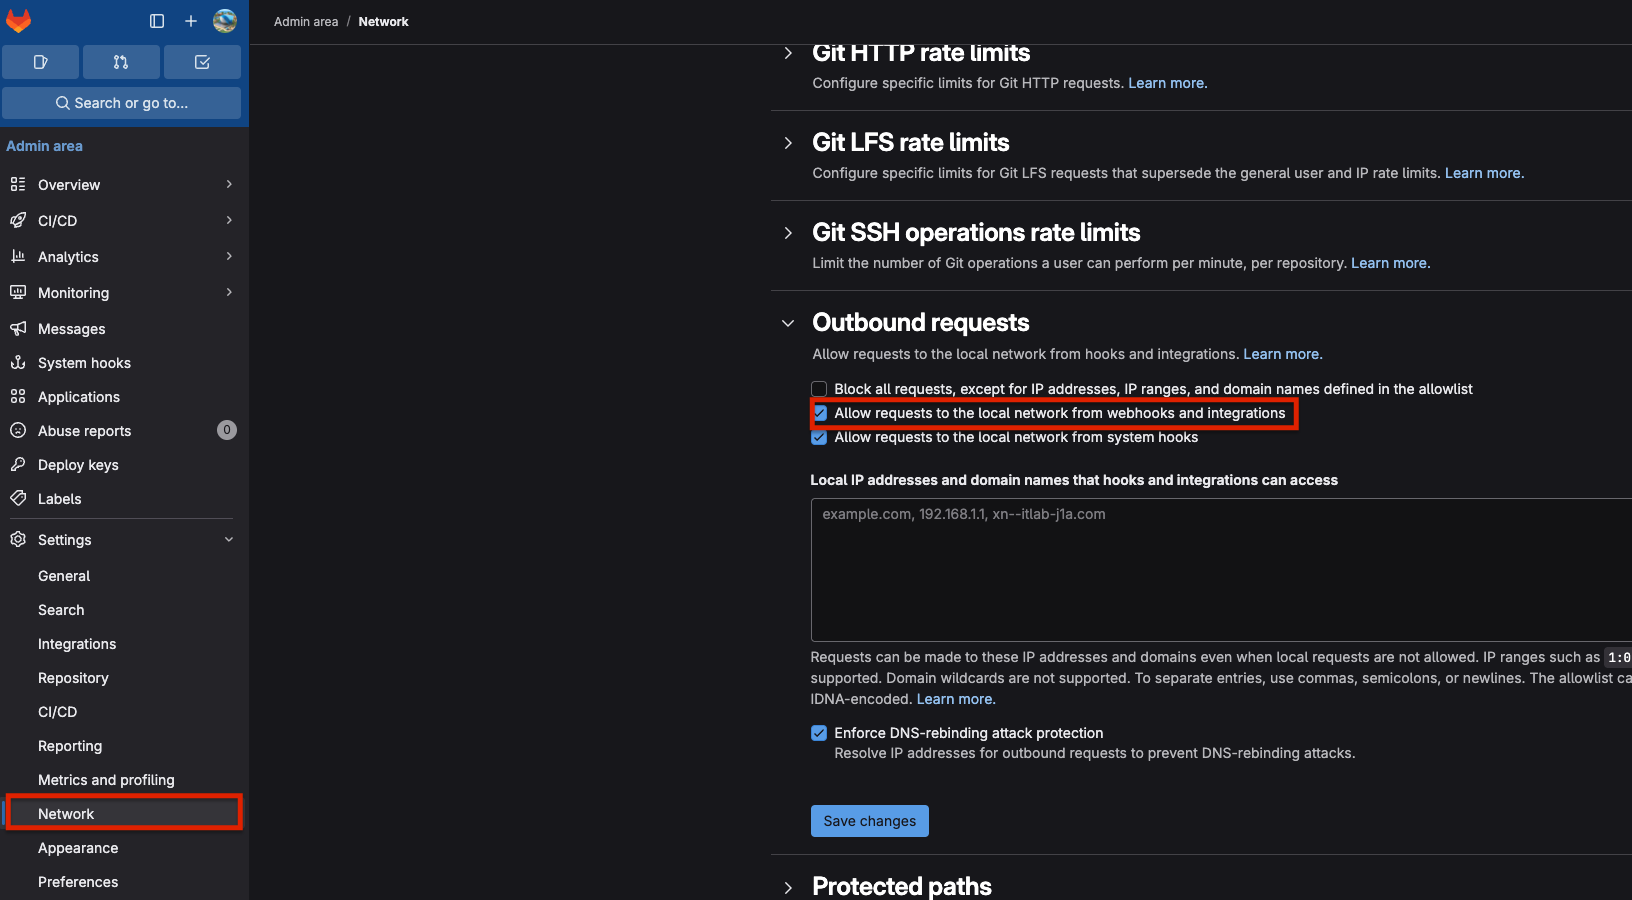
이를 해결하기 위해 웹 UI > Admin > Settings > Network > Outbound requests 에서 Allow requests to the local network from webhooks and integrations 옵션을 선택해서 활성화 하거나
docker-compose.yml 파일에서 아래와 같이 설정해줘야 합니다. (둘은 동일한 작업입니다.)
1
2
3
4
	environment:
      GITLAB_OMNIBUS_CONFIG: |    # gitlab의 설정값 (gitlab.rb 설정파일의 내용에 해당)
        ...
        gitlab_rails['allow_local_requests_from_web_hooks_and_services'] = true # 동일 로컬 네트워크대의 웹훅이나 서비스를 바라볼 수 있도록 허용
Reference
Gitlab 공식 - docker 로 gitlab 설치하기 : https://docs.gitlab.com/install/docker/
InfoGrab - Gitlab 요구 사양 : https://gitlab-docs.infograb.net/ee/install/requirements.html
Comments