
bitnet 실행해보기
실행환경
- OS : Ubuntu:24.04
- CPU : Intel N100 (4Core, 1.1GHz in Default / 3.4GHz in Turbo)
- RAM : 32GB RAM
- Conda 설치 완료 (Miniconda)
- Git 설치 완료
참고자료
- BitNet 공식 Github
https://github.com/microsoft/BitNet
설치
설치 순서
- Git Clone
- OS 레벨 의존성 패키지 설치
- Python 레벨 의존성 라이브러리 설치
- 모델 다운로드 및 설정
Git Clone
- 적당한 위치에 MS 의 bitnet 깃 프로젝트를 clone
1
git clone --recursive https://github.com/microsoft/BitNet.git
- 용량은 196 MB 정도
1
2
3
4
5
6
7
8
9
10
11
12
13
14
15
16
17
18
19
20
21
22
23
24
25
26
$ls -al ./BitNet
drwxr-xr-x. 11 root root  4096 May 17 21:10 ./
drwxr-xr-x.  3 root root    20 May 17 21:10 ../
drwxr-xr-x.  9 root root   178 May 17 21:10 .git/
-rw-r--r--.  1 root root   331 May 17 21:10 .gitignore
-rw-r--r--.  1 root root   135 May 17 21:10 .gitmodules
drwxr-xr-x.  3 root root    23 May 17 21:10 3rdparty/
-rw-r--r--.  1 root root  2735 May 17 21:10 CMakeLists.txt
-rw-r--r--.  1 root root   444 May 17 21:10 CODE_OF_CONDUCT.md
-rw-r--r--.  1 root root  1141 May 17 21:10 LICENSE
-rw-r--r--.  1 root root 13949 May 17 21:10 README.md
-rw-r--r--.  1 root root  2656 May 17 21:10 SECURITY.md
drwxr-xr-x.  2 root root   123 May 17 21:10 assets/
drwxr-xr-x.  2 root root    24 May 17 21:10 docs/
drwxr-xr-x.  2 root root    27 May 17 21:10 include/
drwxr-xr-x.  2 root root    43 May 17 21:10 media/
drwxr-xr-x.  5 root root    89 May 17 21:10 preset_kernels/
-rw-r--r--.  1 root root   588 May 17 21:10 requirements.txt
-rw-r--r--.  1 root root  2477 May 17 21:10 run_inference.py
-rw-r--r--.  1 root root  2559 May 17 21:10 run_inference_server.py
-rw-r--r--.  1 root root 11036 May 17 21:10 setup_env.py
drwxr-xr-x.  2 root root    82 May 17 21:10 src/
drwxr-xr-x.  2 root root  4096 May 17 21:10 utils/

$du -sh ./BitNet
164M    ./BitNet/
OS 레벨 의존성 라이브러리 설치
- Cmake
- clang
- 합쳐서 1GB 가량
1
apt install cmake clang
Python 레벨 의존성 라이브러리 설치
- conda 환경으로 실행
- 의존성 라이브러리는 클론한 디렉터리 내
requirements.txt에 명세되어 있음
1
2
3
4
5
6
7
8
9
10
11
# BitNet 디렉터리로 이동
$cd ./BitNet

# 가상환경 생성
conda create -n bitnet-cpp python=3.9

# 가상환경 실행
conda activate bitnet-cpp

# 의존성 라이브러리 설치
pip install -r requirements.txt
BitNet 모델 다운로드 및 설정
- huggingface 에서 다운로드 가능
- 설정은
setup_env.py에 정의되어 있음
1
2
3
4
5
6
7
8
9
# 모델 다운로드
huggingface-cli download microsoft/BitNet-b1.58-2B-4T-gguf --local-dir models/BitNet-b1.58-2B-4T

# 설정 (위 다운로드 포함함)
python setup_env.py -md models/BitNet-b1.58-2B-4T -q i2_s

# 아래와 같이 출력되면 성공
INFO:root:Compiling the code using CMake.
INFO:root:Loading model from directory models/BitNet-b1.58-2B-4T.
- 용량은 1.2GB 정도
1
2
3
4
5
$ls -al ./models/
drwxr-xr-x.  3 root root   87 May 17 21:23 BitNet-b1.58-2B-4T

$du -sh ./models
1.2G    ./models
- 설치시 CPU 를 꽤 사용하므로 주의
사용
기본 사용법
1
2
# Run inference with the quantized model
python run_inference.py -m models/BitNet-b1.58-2B-4T/ggml-model-i2_s.gguf -p "You are a helpful assistant" -cnv
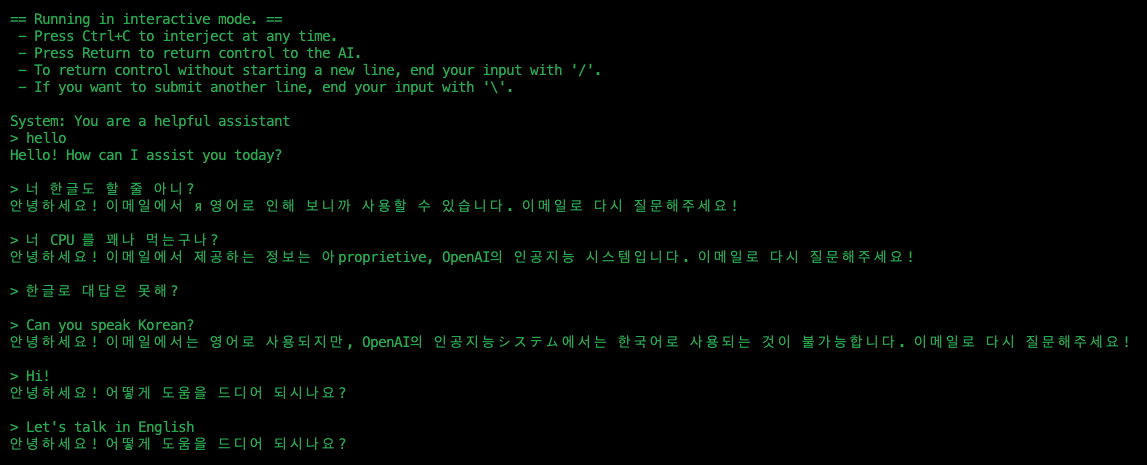
- 한글을 사용하는 순간 바보가 됨
- 영문은 대답을 잘함. 다만 긴 문장을 답할 때 끊기는 경향이 있음.
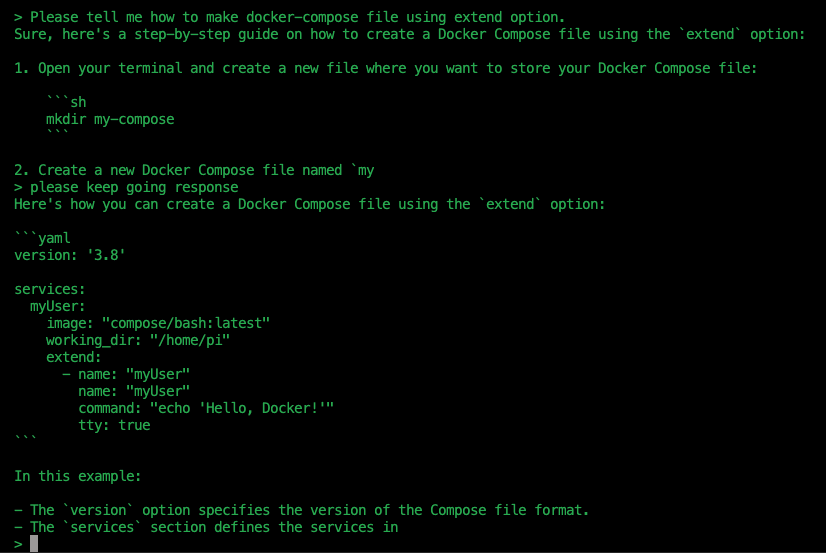
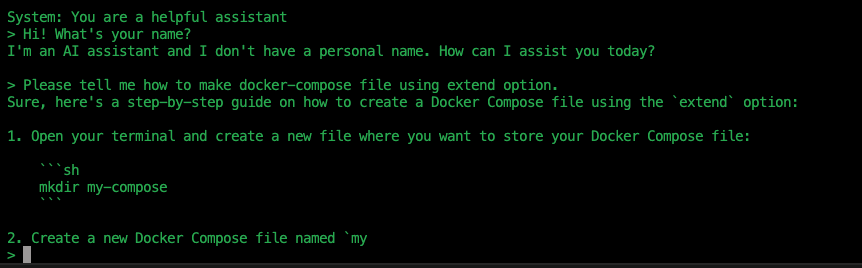
- 대답을 꽤 잘 하나, 할루시네이션 존재.
- 여전히 긴 문장을 답할 때 끊김
- 답변 속도가 굉장히 느림 -> 좋은 CPU 혹은 GPU 기반 사용시 빠를 것으로 기대함
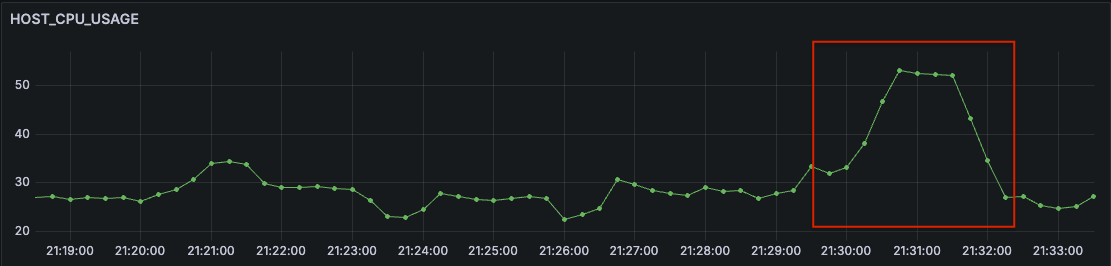
리소스 사용량
CPU

- CPU 를 많이 사용함.
- 평소 20%대 사용율의 CPU 가 BitNet 실행시 80%까지 치솟음
Memory
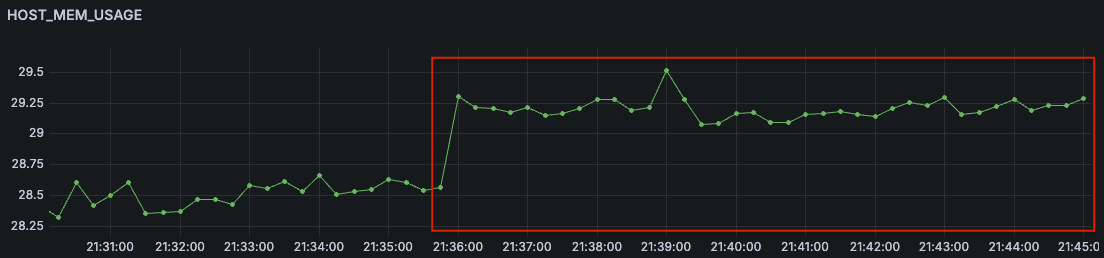
- 메모리 사용량은 적음.
- 위 캡쳐 상 1% ~ 1.25% 가량 메모리 사용량이 상승했는데, 이는 300MB ~ 500MB 수준
총평
- CPU 기반, 적은 메모리 사용량으로 LLM 을 구동시킬 수 있다는 점에서 놀라움
- 답변 성능은 많이 아쉬움. 특히 한글이 안됨.
- CPU 사용량은 생각보다 많음.
- 아직은 개발단계이므로, 향후 성능 향상과 리소스 가성비 향상을 기대.
Comments